How to detect an object using HSV filtering?
This guide assumes you already know how to get images/frames from a camera.
OpenCV
This requires OpenCV to modify your images/frames to add a mask (filter), and find the remaining contours in the image.
Installing OpenCV (Linux):
sudo apt-get install python3-opencv
After installing you can include OpenCV in your python script with:
import cv2 # Opencv for image manipulation functions
How to create a mask (filter)
Start of with creating a copy of the image so the original wont get effected:
# Use a copy of the image for drawing the boxes
image = cv2.imread("testfile.png")
imageCopy = image.copy()
For better results its useful to create a Region of Interest (ROI). This focuses the area in which you will search for your objects. This will improve the speed of the detection and the results will not be affected by anything outside of your ROI.
# Define your ROI boundaries
minX, maxX = 445, 1630
minY, maxY = 0, 775

# Extract ROI
roi = imageCopy[minY:maxY, minX:maxX]
Now transform the image to HSV format:
hsvImage = cv2.cvtColor(roi, cv2.COLOR_BGR2HSV)
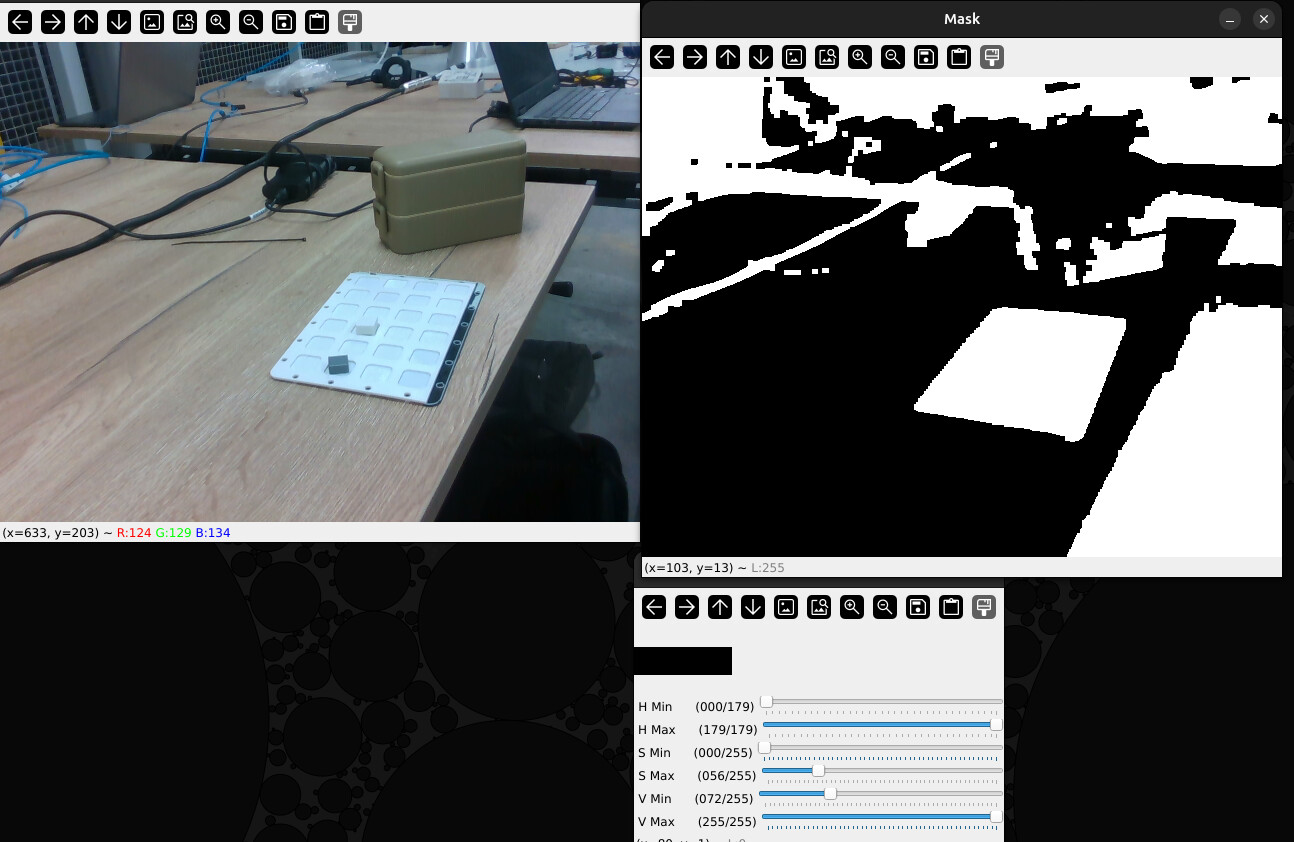
After transforming it to HSV you want to figure out the values for the image you want to detect. I have created a small script to easily identify the values you need:
HSV_Image_Testing.py (1.7 KB)
Ones you have found a range that works for you, fill it in with the code below and create the mask.
# Lower/Upper bound for hue, e.g., for green-yellowish tones
hue = [0,100]
# Lower/Upper bound for saturation, to exclude very low saturation colors
saturation = [0,100]
# lower/Upper bound for brightness (value)
value = [100, 255]
# Define the lower and upper bounds for the color range to be removed
lowerHSV = np.array([hue[0], saturation[0], value[0]], dtype=np.uint8)
upperHSV = np.array([hue[1], saturation[1], value[1]], dtype=np.uint8)

# Create a mask that identifies the regions of the image that fall within the HSV range
mask = cv2.inRange(hsvImage, lowerHSV, upperHSV)
Optional: This might improve the mask stability but isn’t necessary. (Test yourself if it improves the picture)
kernel = np.ones((5,5), np.uint8)
mask = cv2.morphologyEx(mask, cv2.MORPH_OPEN, kernel)
mask = cv2.morphologyEx(mask, cv2.MORPH_CLOSE, kernel)
Example mask to detect the plate:
Gabbing the remaining contours
In this example we needed to detect small blocks within the picture. After making the mask were only the blocks got detected we used OpenCV’s contour finder the find the squares.
contours, _ = cv2.findContours(mask, cv2.RETR_EXTERNAL, cv2.CHAIN_APPROX_SIMPLE)
  detectedBlocks = []
After cv2.findcontours() loop over all the contours and use logic to see if it matches what you are looking for (in this case small blocks).
for contour in contours:
    x, y, w, h = cv2.boundingRect(contour)

    # Convert bounding rect to a square (centered on original rect)
    side = max(w, h)
    center_x = x + w // 2
    center_y = y + h // 2
    square_x = center_x - side // 2
    square_y = center_y - side // 2

    # Normalize w and h
    w, h = side, side

    # Filter by size
    if 40 <= w <= 115 and 40 <= h <= 115:
        # Append the found blocks to a list with its coordinates
        detectedBlocks.append([x, y, w, h, 0])  # angle = 0 for squares

        # Draw the square
        top_left = (square_x + minX, square_y + minY)
        bottom_right = (square_x + minX + side, square_y + minY + side)
        cv2.rectangle(imageCopy, top_left, bottom_right, (0, 255, 0), 2)
Afterwards all the detected blocks (that weren’t removed by the logic (block size)), can be found with the X and Y axis in the detectedBlocks[] list.