Festo’s electronically controlled pneumatic switches can easily be controlled by a PLC, using Festo’s connecting cables.
To wire the switches to the PLC, you first need to plug in the individually colored cables into the PLC. Here are the colors and where they need to be plugged into:
- White = 24V (live)
- black = signal
- blue = ground
However, you don’t need to plug in the white wire if the PLC supplies 24V on the signal wire. The Festo switch can just use the 24V of the signal pin to switch.
Now that the PLC-side has been wired, you just need to plug in the switch side of the cable en tighten the holder ring.
Programming
To program the PLC to be able to interact with the pneumatic switch, you can follow these steps:
- Create an output tag in your default tag table corresponding to where you plugged the signal wire into the PLC. (I also made a start button tag to start the program)
- Create code to switch the pneumatic switch (this example is made in the programming language FBD)

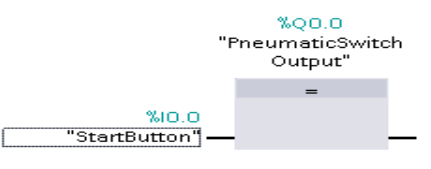
With this, you can actuate the pneumatic switch by pushing the start button. Keep in mind that with this code, it only stays switched as long as the start button is held down. If you need to activate the pneumatic switch for a certain amount of time when the button is pressed, you should use a TP (Time Pulse) block. Here is an example:
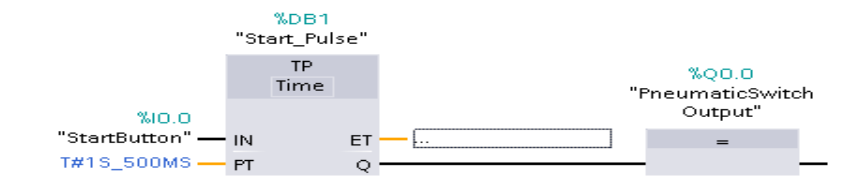
Now when the button is pressed, it triggers a pulse of 1.5 seconds. If you quicly press and release it, it will still trigger for that 1.5 seconds. If you hold down the button for longer than the 1.5 seconds, it will only stay on for the 1.5 seconds and then you need to release the button to be able to trigger it again.