In a lot of cases motor or sensors you want to use are controlled using 5 volts coming from your arduino. But in some cases you are going to run into higher voltage components that cannot just easily fix. This How-To will help give some solutions for controlling higher voltage components using an arduino.
Relais
In a lot of cases the first thing you are going to want to look at is a relais. They are very easy to set up and there will always be some in the robotlab. The relais can be use for both AC and DC signals up to a relatively high voltage. The relais needs to hooked up to both the arduino and another power source with the prefered voltage. The relais concists of two different circuits, one with the arduino and one with the high voltage line. The arduino circuit basically only consists of a coil that will magnitise if the arduino gives 5 volts. The relais also has a normally open swith between the power line. If the coil from the arduino line magnatises, the switch in the powerline will switch and let elektricity through.
If an AC signal is given through the arduino, the switch between the powerline will open and close rapidly and cause an AC signal to appear in the powerline.
optocoupler
An octocoupler works practically the same as a relais. It also consists of two seperate circuits with a powerline and a arduino line. The only difference is that instead of a coil and magnitised normaly open switch it uses a light and a photo transistor switch to open and close the high voltage circuit. This causes less magnetisation and is thus used in highly sensitive setups. It can also be used for both AC and DC circuits alike. For more info you can watch this video.
H-Bridge
The H-Bridge is something you will probably already have used. It is a relais that can be switched to turn two seperate ways. This is very useful for using a motor because this means the motor can be switched from turning left to turning right.
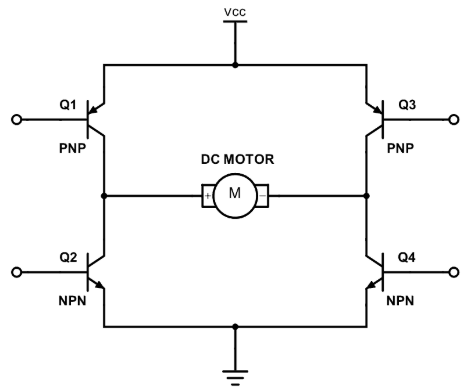
It does this by switching on and off the switches depicted above. To have the motor turning the current has to run through the motor, so Q1 and Q4 or Q3 and Q2 have to be switched together. By switching Q1 and Q4 the motor will turn from the + to - side and if you switch Q2 and Q3 the motor will run from the - to + side. for more info watch this video