Kawasaki robot is quite tricky to control because the robot is quite old and use a special programming language which is not really beginner-friendly. So @A.Vonk have made a special class to control the robot to make the control easier. You can look at the code here: PromoBot Class
Using this class you can easily control the robot from your laptop through a python code. Here are the step by step on how to use it:
-
Connect your laptop to the Kawasaki robot by following the steps that is already explained here: Kawasaki robot (hands-on)
-
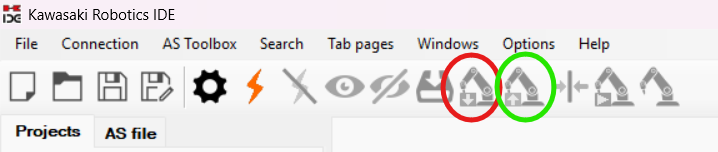
You will notice that traditionally, to program the Kawasaki robot you need to do it in KIDE application that use AS language. To be able to program the robot using python you need to upload this codes: TCP Robot Code to the Kawasaki robot (if it is not uploaded yet into the robot. You can check it by pressing the button circled in red. If t is not uploaded yet press the button circled in green and choose the codes from the GitHub)
-
If the program in the robot is already correct now you can use the PromoBot class directly into your python program. Just make sure that the
PromoBot_class.pyfile is the same directory with your python code. Then in your new python file you just need to call the class by inserting:
from Promobot_class import Kawasaki_1
//(Kawasaki_1 here refers to Kawasaki FS03N. You can adjust it by changing the code inside the class)- Now there are some functions to control the robot:
PAUSE: to put the robot move on pause (the foreground program will stop but the background program will still running)CONTINUE: to continue the robot move if the robot put on pauseWAIT_UNTIL_DONE: wait until the previous function is done before executing the next one (the idea is so you do not need a delay at the end of every command)printIP: print the IP address of the robotHOME: Go to robot home position (this can be defined through the teach pendant)HOME2: Go to robot second home position (since there are 2 home positions in the Kawasaki Robot, also can be defined through the teach pendant)HERE: give the current robot’s joint positionHERE_TRANS: give the current robot’s actual position (cartesian coordinates)CP: to toggle the continuous pathing for the robot (ON/OFF)ACCEL: to set the robot’s acceleration (only for the following move command(s))ACCEL_ALWAYS: to set the robot’s static accelerationDECEL: to set the robot’s deceleration (only for the following move command(s))DECEL_ALWAYS: to set the robot’s static decelerationSPEED: to set the robot’s speedJMOVE: move robot through its joint (the input has to be the joint position, ex: JT1,JT2, … JT6)JMOVE_TRANS: move robot through its joint (the input has to be the TCP position which is: X,Y,Z,O,A,T)LMOVE: move robot’s end effector in linear trajectory (with joint position input)LMOVE_TRANS: move robot’s end effector in linear trajectory (with TCP position input)TOOL: set the rotation point of the end effector based on the EoAT (End of Arm Tool) you use
Now you can control the robot just by using the functions inside the class. As you can see the function is made similar like the UR command because the UR is the most used robot in the robotlab. On top of that, inside the class there are also another classes like Robot_Hand and Intel_Camera to control another components especially in the Promobot project.
Here is an example of the code implementation:
//Moving 2 robot simultaneously
from Promobot_class import Kawasaki_1

from Promobot_class import Kawasaki_2

k1 = Kawasaki_1()

k2 = Kawasaki_2()

k1.printIP()

k2.printIP()

k1.SPEED(100)

k2.SPEED(45)

k1.TOOL(0, 0, 0, 0, 0, 0)

k2.TOOL(0, 0, 0, 0, 0, 0)

k1.HOME()

k2.HOME()

k1.JMOVE(4, -15, -125, 9, 22, 170)

k2.JMOVE(4, -15, -125, 9, 22, 170)

k1.JMOVE_TRANS(20, 370, 150, 90, 90, 90)

k2.JMOVE_TRANS(20, 370, 150, 90, 90, 90)

k1.JMOVE_TRANS(20, 550, 150, 90, 90, 90)

k2.JMOVE_TRANS(20, 550, 150, 90, 90, 90)

k1.LMOVE_TRANS(20, 370, 150, 90, 90, 90)

k2.LMOVE_TRANS(20, 370, 150, 90, 90, 90)
*Note: this code can still be improved. You can ask @A.Vonk for any further question