How to install and use ROS2 to connect and program an Doosan cobot.
*Note using ROS2 is not as difficult as people claim. But you will need to be familiar with using terminal commands and some (Linux) problem solving. You will also require running a working version of Linux either through a virtual machine or native. For this tutorial I’m using Ubuntu 22.04 humble and a Doosan M1013
Programming a Doosan robot is difficult as is. So lets try doing it with ROS2!
Pro’s to using ROS2 with a Doosan is that you can simulate your code without having access to the cobot. ROS2 offers simulations of the cobot so you can always test your code. You can also use regular python libraries and functions without workarounds like with homberger hub. This tutorial only goes into how to program the Doosan with Python using ROS2. It does not go into the different functionalities and features that ROS2 offers.
Installing ROS2.
ROS2 is an acronym for “Robot Operating System 2”. It does not run on the cobot itself but on your laptop. To install ROS2 you will need a compatible version of Linux. I’d recommend Ubuntu 22.04 (humble) because this is what I use. You can find the install page for ROS2 ubuntu22.04 here. Do not that Windows 10 is an install possibility, but I would not recommend this as support for it is very low and there are almost no resources on this. Nor does it work for the Doosan cobot.
*Note If you use a different version of Linux you should change the version on the bottom left of the page. Do note not all versions of Linux are compatible with ROS or the Doosan packages.

When you have ros2 installed be sure to run (in the folder of your ros2 install) source ./setup.bash in terminal. This should ALWAYS be done when you want to use ros2 commands whenever you start a new terminal instance. If you don’t want to do this every time you can run gedit ~/.bashrc. This will open a file in terminal, go to the very bottom and add the source command with your workspace in front of it. So for me its:

This will always automatically source the ros2 commands. The source command tells the terminal what commands should be added to the current session, without it your terminal doesn’t check there for available commands. Its comparable to changing environmental variables on windows.
Installing Doosan packages.
When you have done this you’re ready to install the Doosan ros2 package files.
You can find the link for Ubuntu 22.04 here
When you get to the colcon build part of the setup, I would highly recommend adding --symlink-install to the command. This will automatically link your working python script to the ros install, making it so you don’t have to rebuild the ros2 packages each time you edit your python script. So the command will be:
colcon build --cmake-args -DDRCF_VER=3 --symlink-install
You can always rebuild the project and run colcon build again, so this can always be done later.
If you run into any issues during the install you can find solutions online. If you can’t find solution to your problem you can ask AI to help you with Linux and ROS issues.
*Note If you’re not using Ubuntu 22.04 be sure to set the install guide to the correct version
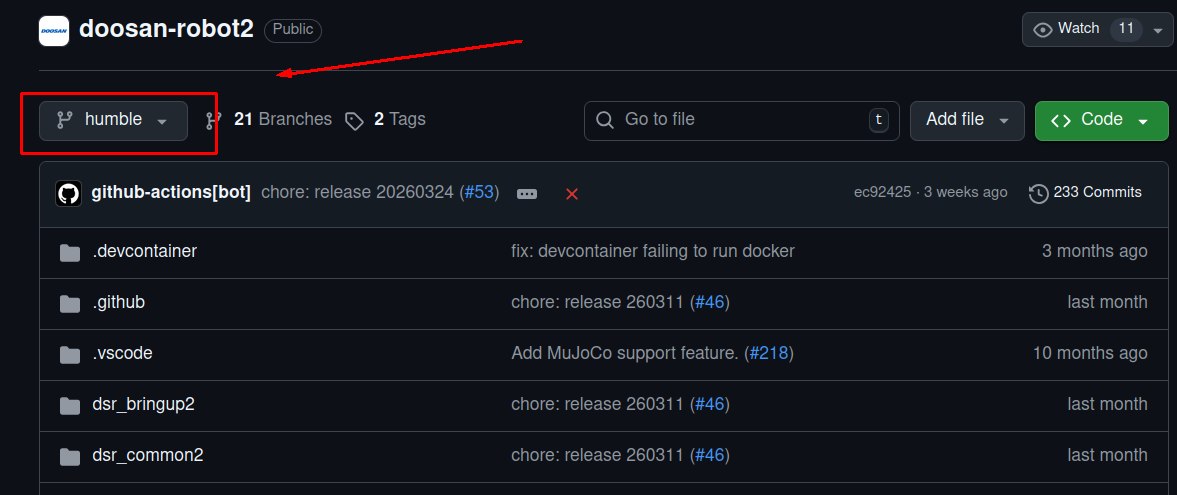
Be sure to run source ./install/setup.bash from within the project folder to enable the Doosan ROS commands.
You can add this to bashrc as well, but its generally considered bad practice. This is because you might get confusing results when you use ros2 in the future having sourced this repository. If you’re only using ros2 for this project you can add it to bashrc for simplicity.
*Note If you don’t source Doosan’s setup.bash when you start a new terminal instance you can not run your scripts. You have to source for EVERY new instance of the terminal. Even if you open a second terminal you have to resource for the new terminal. Adding the source command to bashrc removes this requirements and automatically sources on a new terminal instance. But is considered bad practice for project files.
Connecting to the Doosan Cobot or starting a simulation.
On the github page of doosan-robot2 you will see 3 different launch commands, Rviz2, Gazebo simulation and Moveit2. For your project you will probably only need to use Rviz2 to connect to the cobot and enable move command. For each launch command you will see 2 modes:
Virtual: Virtual means the simulation. If you open this you can simulate a Doosan cobot and test your code.
Real: Real mode means the actual cobot. In this command you have to give an IP address, this is the IP address of the cobot. You can find this on the teach terminal.
For real mode, make sure you are connected to the cobot using an ethernet wire, and have setup your network settings. You can test your connection by putting: ping [cobot ip address] in terminal.
Running python scripts.
To test if you are successfully connected to the Doosan cobot you can run a build in test script. You can run either dance or slope_demo. To run scripts you can do:
ros2 run [package] [script]
For the example you can run:
ros2 run dsr_example slope_demo
*Note If you have connected in real mode this will move the cobot in an unknown direction, please keep your hand on the emergency button!
Creating a custom package and script.
To create custom scrips, I’d recommend first making a custom package. To create a custom package you have to go to your ros workspace folder (assumingly named doosan-robot2) using terminal and run:
ros2 pkg create [PACKAGE NAME] --build-type ament_python --dependencies rclpy
This will create a python ROS package that looks like this:
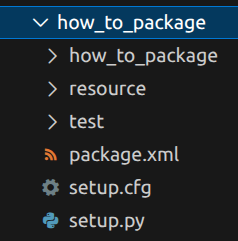
(opened in visual studio code)
In the second folder, the folder with the same name as your package folder you will find an __init__.py folder. Do NOT delete this. In the same folder as the __init__.py you can create a custom script and do your custom coding. Just create a file named [your script].py and you can get started. There is an example script you can use at the bottom of this how to to get you started on your custom script. I’d recommend using it as a baseline.
When you have made your script you’re almost ready to run it! But not yet. After creating a script you should open the setup.py file that was created in your package folder. At the bottom you will see Entry Points with console scripts and open brackets. In those open brackets you have to define the script you just made. You can do that by adding:
'[Script Name] = [package].[filename]:main'
So for me its:
entry_points={
    'console_scripts': [
	'testscript = how_to_package.testscript:main',
     ],
},
Almost done! I promise. When you have created your python script and added it to the entry points all you have to do is rebuild the Doosan repository to recognize the newly created package and defined scripts. You can do this by using terminal to go back into your ROS workspace folder and running:
colcon build --cmake-args -DDRCF_VER=3 --symlink-install
Again, I’d recommend adding --symlink-install. What this does is that each time you edit your script and save it, it will automatically use the new saved script when running it. Otherwise you have to rebuild every time you make an edit to your file.
When you have done all that and rebuild the workspace you can finally run: ros2 run [package] [script name] and your script should work.
And that’s it. You have setup ROS2 and the Doosan packages and are ready to program your cobot! ROS2 has ton of features and functionality to help you with your project if you’re interested in learning those. But this can be a chore and take up a ton of time. But you can also use this method to simply program the Doosan cobot in python as you would an Universal Robot.
Useful information
If you run into issues you can look on the issues page of the doosan-robot2 repository. At the time of writing this How-To they respond quite quickly and are very helpful. They have helped me with some issues and have helped tons of other people. Look there for your issue first and if they don’t have it you can ask it yourself.
*Note The issue page is for issues with your Doosan ROS installation, and not for questions on how to program the cobot itself.
I would also recommend looking (using an IDE) inside the DSR folders from the doosan-robot2 workspace. Every function you call using python is in there, so you can also use a find function to look for specific functions. And you might come across something useful for your project.
For a list of python API commands: This can be useful for importing functions
Official API Manual: This can be useful to look up how to use commands
Recommended starting script for custom ROS2 scripts
import rclpy
import DR_init
import sys
import random
import time


def main(args=None):
    rclpy.init(args=args)

    #Cobot settings
    ROBOT_ID = "dsr01"
    ROBOT_MODEL = "m1013"
    DR_init.__dsr__id = ROBOT_ID
    DR_init.__dsr__model = ROBOT_MODEL

    #Script name, but not really necessary to change.
    node = rclpy.create_node('example_py', namespace=ROBOT_ID)

    DR_init.__dsr__node = node

    #This import has to be here, do not move this. Here you can add every command you want to use in the rest of the script. There are already some commands here to get you started.
    from DSR_ROBOT2 import get_current_posx, posx, movel, movejx, movej, movejx, posj, set_digital_output, set_robot_mode, ROBOT_MODE_AUTONOMOUS, get_robot_mode, get_current_pose, get_digital_input, get_modbus_input

    #Set the robot mode in robot_mode_autonomous to enable remote control commands. In this mode you CAN NOT use freemove.
    if get_robot_mode() != ROBOT_MODE_AUTONOMOUS:
        set_robot_mode(ROBOT_MODE_AUTONOMOUS)

    #Robot mode 0 means freemove. You can uncomment this and the robot will not listen to commands but can be freemoved.
    #You can maybe make a second script to be ran to enable freemove, or add some custom code that enables/disables freemove when you want.
    #set_robot_mode(0)

    #Here you can move the robot
    cobot_start_position = posx(300, 34, 1000, 0, 90, 0) #x, y, z, rx, ry, rz
    movejx(cobot_start_position, vel=30, acc=30)

    while(1):
        print(get_current_posx())
        #main loop


    print("Example complete")
    rclpy.shutdown()

if __name__ == '__main__':
    main()