Intro
The 2 methods of connecting a stepper motor discussed in this How To are:
- With a CNC shield and arduino Nano
- With a microstep driver
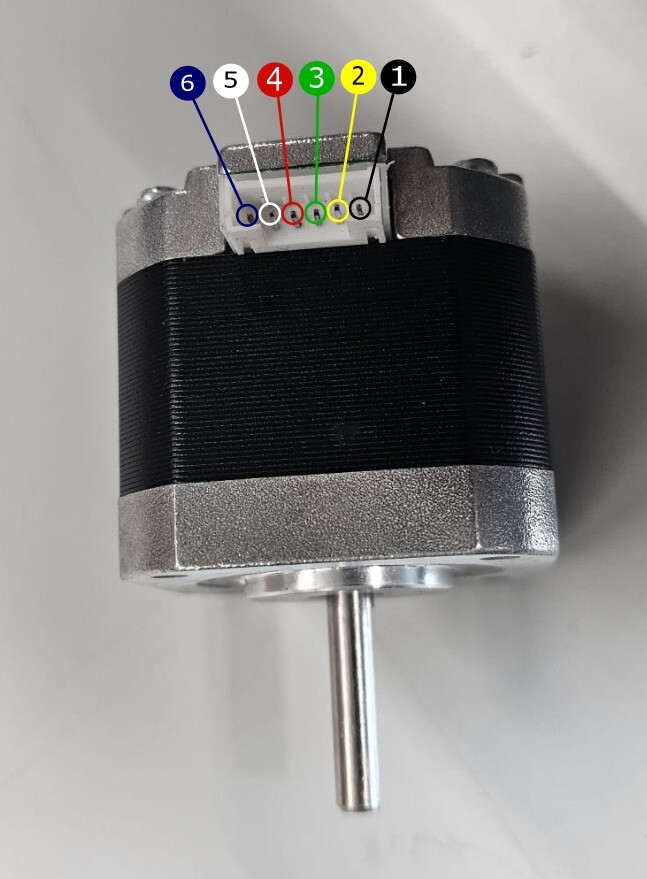
Some things to look out for is the pin-out of the stepper motor itself.
A commmon way that the drivers are connected is that one spool is on pin 1 and 3 and the other spool is on 4 and 6. This is not always the case. Make sure to check the continuity of the pins with a multi-meter.
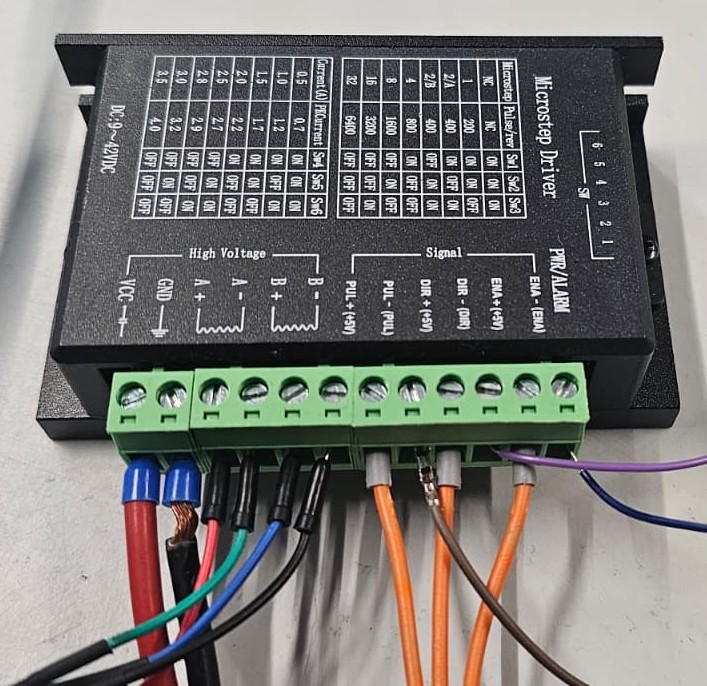
microstep driver
The way we did this was with a raspberry pi 5(abbreviated to RPI5). This can be replaced with any microcontroller as long as you can ouput signals over wires.
And a microstep driver TB6600
so the list of required parts is:
- A raspberry pi
- A micro step driver TB6600
- Wires
- A 9 volt power supply
- A 3.3 volt power supply
We connected it as shown on the wiring diagram
The 3.3V power supply is delivering the power for the logic of the microstep driver and the 9V supply is supplying power to the microstep driver for actually moving the motor. We found that just supplying the 3.3 volt from the RPI5 can give some problems as the current draw can peak quite high.

If you’re also running a RPI5 then you can use this example code.
from time import sleep
import gpiozero


cycles = 1000 # This is the number of cycles to be run once program is started.
cyclecount = 0 # This is the iteration of cycles to be run once program is started.
ENE = gpiozero.DigitalOutputDevice(22)     # Controller Enable Bit connected to pin 22 (High to Enable / LOW to Disable).
DIR = gpiozero.DigitalOutputDevice(27)     # Controller Direction Bit connected to pin 27(High for Controller default / LOW to Force a Direction Change).
PUL = gpiozero.DigitalOutputDevice(17)     # Stepper Drive Pulses connected to pin 17
delay = 0.0000015                          # This is actualy a delay between PUL pulses - effectively sets the motor rotation speed.
duration = 2000                            # This is how many pulses are produces so how long the motor is turning

def forward(self,duration): #In this part the foreward movement is defined
    ENE.on()
    DIR.off()
    print(f'DIR set to HIGH - Moving Forward at {str(delay)} ')
    print('Controller PUL being driven.')
    for x in range(duration):
        PUL.on()
        sleep(delay)
        PUL.off()
        sleep(delay)
    ENE.off()
    sleep(.5) # pause for possible change direction
    return


def backward(self,duration):#In this part the foreward movement is defined
    ENE.on()
    DIR.on()
    print('DIR set to HIGH - Moving backwards at ' + str(delay))
    print('Controller PUL being driven.')
    for x in range(duration):
        PUL.on()
        sleep(delay)
        PUL.off()
        sleep(delay)

    ENE.off()
    sleep(.5) # pause for possible change direction
    return

while cyclecount < cycles:
    forward()
    reverse()
    cyclecount = (cyclecount + 1)
    print('Number of cycles completed: ' + str(cyclecount))
    print('Number of cycles remaining: ' + str(cycles - cyclecount))
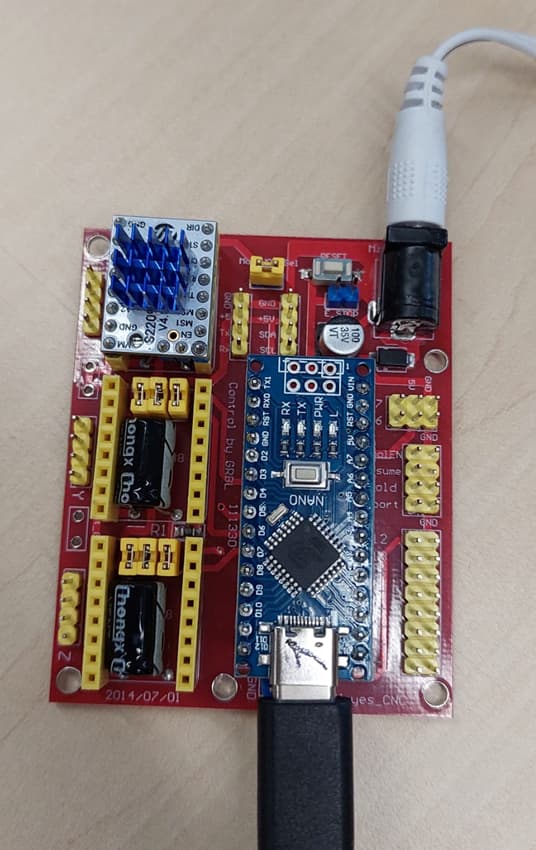
CNC Shield with an Arduino Nano
To recreate it the same way we did, the following things are needed:
- A CNC Shield V4 – for Arduino Nano
- TMC2209 Motor Driver Module V4.0
- Arduino Nano
- A stepper motor
- A stepper motor extension cable
- An AC-DC adapter 12V
The first step is to connect everything. Place the arduino and the motor driver on the CNC shield. Connect the extension cable to the stepper motor and the CNC shield. Now you can connect the arduino to your laptop and plug the adapter in. Make sure when placing the motor driver, the adapter is not plugged in.
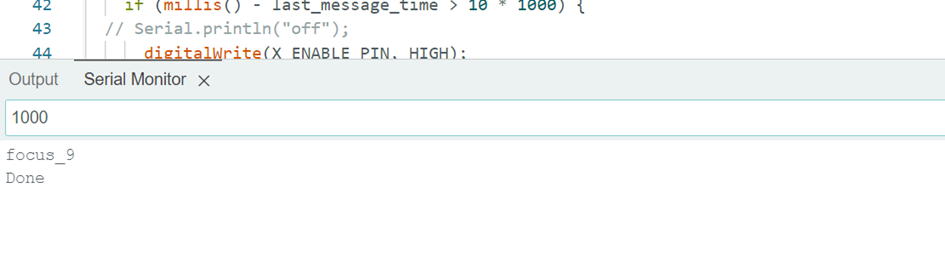
When everything is connected, see picture, the following code can be run.
#include <AccelStepper.h>

// Define the pins for your stepper motor
#define X_STEP_PIN 5
#define X_DIR_PIN 2
#define X_ENABLE_PIN 8

String fp_num = "focus_9";
uint64_t last_message_time = 0;

int PinIn = 13;

// Create an instance of AccelStepper with DRIVER mode (for step/direction control)
AccelStepper stepper(AccelStepper::DRIVER, X_STEP_PIN, X_DIR_PIN);

void setup() {
    Serial.begin(115200);
    Serial.setTimeout(10);
    delay(1000);
    Serial.println(fp_num);
    stepper.setMaxSpeed(500);      // Set the maximum speed (steps per second)
    stepper.setAcceleration(5000);   // Set the acceleration (steps per second^2)
    pinMode(PinIn, INPUT);
}

void loop() {
    if (Serial.available() > 0) {
        // Read the number of steps from the serial input
        long steps = Serial.parseInt();
        last_message_time = millis();
        // Check if steps value is valid (not 0)
        if (steps != 0) {
            // Move the stepper by the given number of steps
            stepper.move(steps);
            stepper.runToPosition();  // Block until the move is completed

            // Send a "Done" message to the PC after the movement is completed
            delay(1);
            Serial.println("Done");
        if (steps == 0){Serial.println("Done");}
        }
    }
    if (millis() - last_message_time > 10 * 1000) {
  // Serial.println("off");
      digitalWrite(X_ENABLE_PIN, HIGH);
        }
}
After the code is uploaded to the arduino, in the serial monitor the amount of steps can be given. Positive input let’s the stepper motor rotate to the right and a negative input rotates it the other way around.