So many markers
There exist quite a lot of different types of markers, most commonly used for storing information and tracking purposes. In this how-to, some of the most used types of markers that are used, for which only python is required are elaborated upon.
Additionally, some example code to create a marker and some code to read it using a live webcam feed have also been provided.
Types of markers
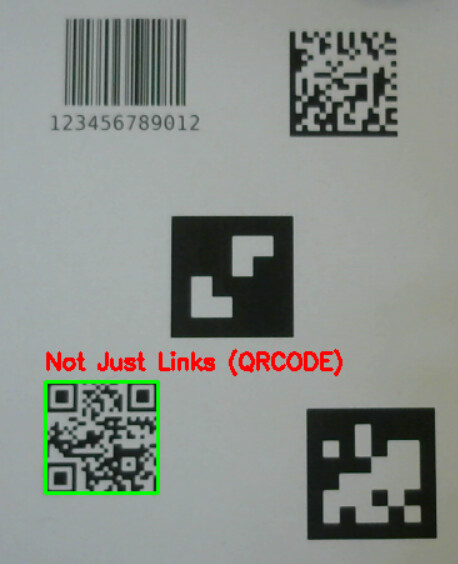
1-D barcode
1-dimentional barcodes are codes comprised of a set of white or black lines. The main purpose of barcodes is to store a very small amount of information, such as a large number.
Barcodes are very quick to process and will work as long as even a small section can be seen, as long as the entire width is available. The main downsides being the lack of stored information, as well as the lack of error correction.
One unique advantage of the barcode is the ability to read it using a laser scanner, which can be both efficient and useful at fairly large ranges, if such a scanner is available.

Code for detection
The code for detecting barcodes here is capable of detecting barcodes of various types, including QR codes, therefore the code used below is the same as the code used in detection for QR codes.
code
import cv2 as cv
import numpy as np
from pyzbar.pyzbar import decode

#Camera settings
Index = 0

Target_brightness = 115
Mounting_high = 83
Cam_FOV = 81.6

#Leave 0 for auto calibration
pixels_per_cm = 0

#Hardware
Grid_res = [2, 2]
Grid_spread = 13.5
Grid_dot_size = 3.5

Clearance_mm = 1.5

def detect_barcodes(frame):
    """Detects and draws all barcodes in the given frame using pyzbar."""
    #Change the feed to grayscale and detect a code
    gray = cv.cvtColor(frame, cv.COLOR_BGR2GRAY)
    barcodes = decode(gray)
    detected_data = []

    for barcode in barcodes:
        #Figure out the location of the barcode, and print it on the shown feed
        (x, y, w, h) = barcode.rect
        cv.rectangle(frame, (x, y), (x + w, y + h), (0, 255, 0), 2)

        #Converts read code and change it to be readable
        barcode_data = barcode.data.decode("utf-8") #---------
        barcode_type = barcode.type
        text = f"{barcode_data} ({barcode_type})"
        cv.putText(frame, text, (x, y - 10), cv.FONT_HERSHEY_SIMPLEX, 0.6, (0, 0, 255), 2)
        #Store the value of the detected code
        detected_data.append(barcode_data)

    return frame, detected_data


if __name__ == "__main__":
    #Open the webcam
    cap = cv.VideoCapture(Index, cv.CAP_DSHOW)
    #Stop if the camera cannot be opened
    if not cap.isOpened():
        print("Error: Could not open webcam.")
        exit()

    while True:
        #Read the frame
        ret, frame = cap.read()
        if not ret:
            print("Error: Could not read frame from camera.")
            break

        #Detect barcodes
        frame, barcodes = detect_barcodes(frame)

        #Print detected barcodes (if any)
        for b in barcodes:
            print("Detected:", b)

        #Display camera feed
        cv.imshow('Webcam Feed', frame)

        #Wait a milisecond
        cv.waitKey(1)
Code for generation
There are many different types of barcodes, this code generates a code 128 barcode, capable of holding ASCII characters other than simple numbers, and is often used in logistics.
code
import barcode
from barcode.writer import ImageWriter

def generate_1d_barcode(data, filename="barcode.png", barcode_type="code128"):
    """
    Generate a 1D barcode image (Code128 or EAN13).

    data: string of the barcode content
    filename: output PNG file
    barcode_type: "code128" or "ean13"
    """

    #Creates the barcode
    BARCODE_CLASS = barcode.get_barcode_class(barcode_type)
    my_barcode = BARCODE_CLASS(data, writer=ImageWriter())

    #Saves the barcode
    my_barcode.save(filename)
    print(f"1D Barcode saved to {filename}")


if __name__ == "__main__":
    # Generate 1D barcode (Code128)
    generate_1d_barcode("123456789012", "my_barcode")
QR code
Like 1-dimensional barcodes, the primary purpose of a QR code is to store information. Unlike the barcode, however, a QR code is 2-dimentional, allowing for much more information to be stored. Although the most well known information in such a code is a link, the information stored inside can be more varied.
One of the main advantages of the QR code is the much higher density of information, as well as the high error correction, allowing a decently large section of the code to be damaged or covered. Additionally, the squares in the corners allows for the code to be easily detected. One particularly useful advantage popularizing the QR code is, of course, the large amount of devices with the ability to detect them build in.
Code for detection
The code for detecting QR codes here is capable of detecting barcodes of various types, including 1-dimentional barcodes, therefore the code used below is the same as the code used in detection for 1-dimentional barcodes.
code
import cv2 as cv
import numpy as np
from pyzbar.pyzbar import decode

#Camera settings
Index = 0

Target_brightness = 115
Mounting_high = 83
Cam_FOV = 81.6

#Leave 0 for auto calibration
pixels_per_cm = 0

#Hardware
Grid_res = [2, 2]
Grid_spread = 13.5
Grid_dot_size = 3.5

Clearance_mm = 1.5

def detect_barcodes(frame):
    """Detects and draws all barcodes in the given frame using pyzbar."""
    #Change the feed to grayscale and detect a code
    gray = cv.cvtColor(frame, cv.COLOR_BGR2GRAY)
    barcodes = decode(gray)
    detected_data = []

    for barcode in barcodes:
        #Figure out the location of the barcode, and print it on the shown feed
        (x, y, w, h) = barcode.rect
        cv.rectangle(frame, (x, y), (x + w, y + h), (0, 255, 0), 2)

        #Converts read code and change it to be readable
        barcode_data = barcode.data.decode("utf-8") #---------
        barcode_type = barcode.type
        text = f"{barcode_data} ({barcode_type})"
        cv.putText(frame, text, (x, y - 10), cv.FONT_HERSHEY_SIMPLEX, 0.6, (0, 0, 255), 2)
        #Store the value of the detected code
        detected_data.append(barcode_data)

    return frame, detected_data


if __name__ == "__main__":
    #Open the webcam
    cap = cv.VideoCapture(Index, cv.CAP_DSHOW)
    #Stop if the camera cannot be opened
    if not cap.isOpened():
        print("Error: Could not open webcam.")
        exit()

    while True:
        #Read the frame
        ret, frame = cap.read()
        if not ret:
            print("Error: Could not read frame from camera.")
            break

        #Detect barcodes
        frame, barcodes = detect_barcodes(frame)

        #Print detected barcodes (if any)
        for b in barcodes:
            print("Detected:", b)

        #Display camera feed
        cv.imshow('Webcam Feed', frame)

        #Wait a milisecond
        cv.waitKey(1)
Code for generation
The code below will generate a simple QR code containing a small scentance.
code
import qrcode
from PIL import Image

def generate_qr_code(data, filename="qrcode.png", size=300):
    """
    Generate a QR code image.

    data: string or URL
    filename: output PNG file
    size: size of the QR code image in pixels
    """

    #Creates the QR code
    qr = qrcode.QRCode(
        version=1,  # controls size, 1 = 21x21 modules
        error_correction=qrcode.constants.ERROR_CORRECT_H,
        box_size=10,
        border=4,
    )
    qr.add_data(data)
    qr.make(fit=True)
    #Creates the image of the QR code
    img = qr.make_image(fill_color="black", back_color="white").convert('RGB')
    img = img.resize((size, size))

    #Saves the QR code
    img.save(filename)
    print(f"QR Code saved to {filename}")

if __name__ == "__main__":
    # Generate QR code
    generate_qr_code("Not Just Links", "my_qrcode.png")
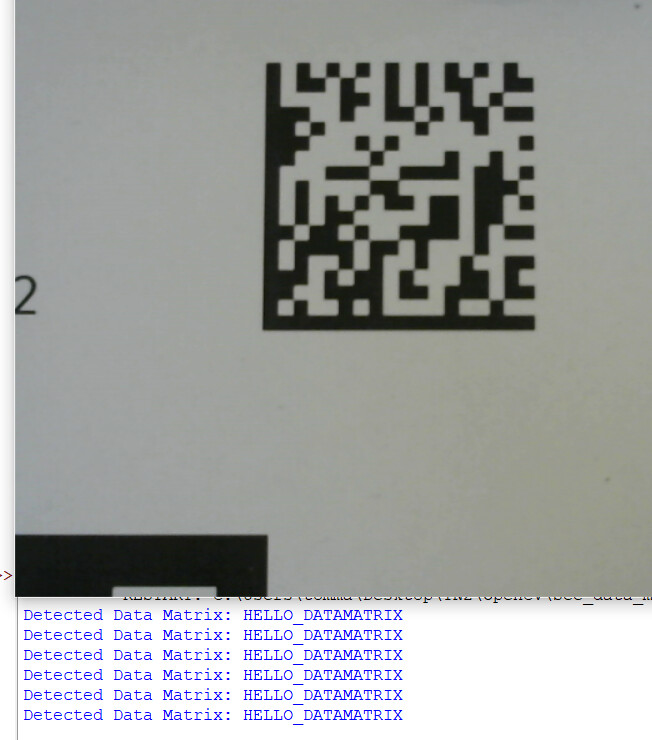
Data matrix
The nature of the data matrix is similar to that of the QR code, although their application can differ. The data matrix is also a 2-dimentional code used to store information.
One of the main advantages of the data matrix is its even higher density of information compared to a QR code, making it particularly effective if the marker needs to be very small. This is further helped by the fact the data matrix, like the QR code, has very strong error correction. Despite its information density, the data matrix does not have as high a total amount of information it can contain compared to the QR code.
One particular disadvantage of the data matrix as it’s used here, is that the decoding process for its detection is fairly dense, potentially slowing down other processes. In particular, reading a data matrix might be more beneficial when doing so from a single image, rather than a live feed.
Code for detection
Due to the decoding being very slow, the code is set to only do so once every 30 frames, this also leads to the frame on the feed not being drawn.
code
import cv2 as cv
from pylibdmtx.pylibdmtx import decode

#Settings
CAM_INDEX = 0
FRAME_WIDTH = 640
FRAME_HEIGHT = 480
SCALE = 0.5  # scale factor for decoding
FRAME_SKIP = 30  # decode every Nth frame


#Initialize webcam
cap = cv.VideoCapture(CAM_INDEX, cv.CAP_DSHOW)
cap.set(cv.CAP_PROP_FRAME_WIDTH, FRAME_WIDTH)
cap.set(cv.CAP_PROP_FRAME_HEIGHT, FRAME_HEIGHT)

if not cap.isOpened():
    print("Error: Could not open webcam.")
    exit()

frame_count = 0
if __name__ == "__main__":
    while True:
        #Read the frame
        ret, frame = cap.read()
        if not ret:
            print("Failed to grab frame.")
            break

        #Count the number of frames
        frame_count += 1

        #Decode every FRAME_SKIP frames
        if frame_count % FRAME_SKIP == 0:
            #Resize for faster decoding
            small_frame = cv.resize(frame, (0, 0), fx=SCALE, fy=SCALE)
            gray_frame = cv.cvtColor(small_frame, cv.COLOR_BGR2GRAY)

            #Decode the data matrix
            decoded_results = decode(gray_frame)

            #print results on after making the data readable
            for d in decoded_results:
                data = d.data.decode("utf-8")
                print("Detected Data Matrix:", data)

        #Display camera feed
        cv.imshow("Data Matrix Detection", frame)

        #Wait a milisecond
        cv.waitKey(1)
Code for generation
Like the QR code, a simple data matrix containing a small sentence is created.
code
from pylibdmtx.pylibdmtx import encode
from PIL import Image

def generate_data_matrix(data, filename="datamatrix.png", size=300):
    """
    Generate a Data Matrix code image.

    data: string content for the code
    filename: output PNG file
    size: output image size in pixels
    """

    #Encodes the data
    encoded = encode(data.encode('utf-8'))

    #Converts to PIL Image
    img = Image.frombytes('RGB', (encoded.width, encoded.height), encoded.pixels)
    img = img.resize((size, size), Image.NEAREST)

    #Saves the image
    img.save(filename)
    print(f"Data Matrix saved to {filename}")

if __name__ == "__main__":
    # Data Matrix code
    generate_data_matrix("HELLO_DATAMATRIX", "my_datamatrix.png")
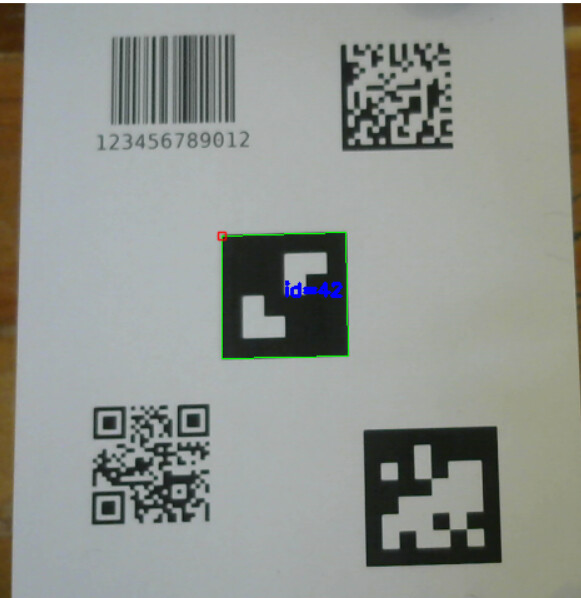
ArUco marker
Aruco markers serve a different purpose than storing information, namely, their primary use is for pose estimation and tracking. There exist various libraries of ArUco markers that will generate a different marker based on its ID. A camera can then be used to detect these markers and follow them.
ArUco markers are fast and simple to use with OpenCV, making them a good choice when in need for an easy tracking solution.
Code for detection
Most of the code is also used for detecting AprilTags, the only significant difference being that it reads from the ArUco marker dictionary 4X4 50, rather than an AprilTag one.
code
import cv2 as cv
from cv2 import aruco

#The webcam to be used
Index = 0


def detect_aruco(frame):
    """Detect and draw ArUco markers in the frame."""
    #Grayscale the image
    gray = cv.cvtColor(frame, cv.COLOR_BGR2GRAY)

    #Choose the ArUco marker dictionary being observed
    aruco_dict = aruco.getPredefinedDictionary(aruco.DICT_4X4_50)
    parameters = aruco.DetectorParameters()

    #Create detector
    detector = aruco.ArucoDetector(aruco_dict, parameters)

    #Detect markers
    corners, ids, rejected = detector.detectMarkers(gray)
    detected_ids = []

    #Determine the ID of the marker and draw it for the feed
    if ids is not None:
        detected_ids = ids.flatten().tolist()
        aruco.drawDetectedMarkers(frame, corners, ids)

    return frame, detected_ids

if __name__ == "__main__":
    #Open the webcam
    cap = cv.VideoCapture(Index, cv.CAP_DSHOW)
    if not cap.isOpened():
        print("Error: Could not open webcam.")
        exit()

    while True:
        #Read the frame
        ret, frame = cap.read()
        if not ret:
            print("Error: Could not read frame from camera.")
            break

        # Detect ArUco markers
        frame, detected = detect_aruco(frame)

        # Print detected marker IDs
        for marker_id in detected:
            print("Detected ArUco ID:", marker_id)

        #Display camera feed
        cv.imshow('Webcam Feed', frame)

        #Wait a milisecond
        cv.waitKey(1)
Code for generation
This code generates the ArUco marker with the ID 42 from the dictionary of 4X4 50.
code
import cv2

def generate_aruco_marker(marker_id, filename="aruco.png",
                          dictionary_name="DICT_4X4_50",
                          size=300, border=1):
    """
    Generate an ArUco marker image.

    marker_id: int, ID of the marker from the dictionary
    filename: output PNG file
    dictionary_name: name of the dictionary from cv2.aruco
    size: output image size in pixels
    border: number of black border bits around the marker
    """

    #Makes sure the file ends in .png
    if not filename.lower().endswith(".png"):
        filename += ".png"

    #List of available dictionaries
    ARUCO_DICTS = {
        "DICT_4X4_50": cv2.aruco.DICT_4X4_50,
        "DICT_4X4_100": cv2.aruco.DICT_4X4_100,
        "DICT_4X4_250": cv2.aruco.DICT_4X4_250,
        "DICT_4X4_1000": cv2.aruco.DICT_4X4_1000,
        "DICT_5X5_50": cv2.aruco.DICT_5X5_50,
        "DICT_5X5_100": cv2.aruco.DICT_5X5_100,
        "DICT_5X5_250": cv2.aruco.DICT_5X5_250,
        "DICT_6X6_50": cv2.aruco.DICT_6X6_50,
        "DICT_6X6_100": cv2.aruco.DICT_6X6_100,
        "DICT_6X6_250": cv2.aruco.DICT_6X6_250,
        "DICT_7X7_50": cv2.aruco.DICT_7X7_50,
        "DICT_7X7_100": cv2.aruco.DICT_7X7_100,
        "DICT_7X7_250": cv2.aruco.DICT_7X7_250,
        "DICT_ARUCO_ORIGINAL": cv2.aruco.DICT_ARUCO_ORIGINAL
    }

    if dictionary_name not in ARUCO_DICTS:
        raise ValueError(f"Unknown dictionary '{dictionary_name}'. "
                         f"Valid options: {list(ARUCO_DICTS.keys())}")

    try:
        #Loads dictionary
        dictionary = cv2.aruco.getPredefinedDictionary(ARUCO_DICTS[dictionary_name])

        #Generates marker based on the dictionary
        marker_img = cv2.aruco.generateImageMarker(dictionary, marker_id, size, border)

        #Saves the image
        cv2.imwrite(filename, marker_img)
        print(f"ArUco marker saved to {filename}")

    except Exception as e:
        print(f"Error generating ArUco marker: {e}")

if __name__ == "__main__":
    # ArUco marker code
    generate_aruco_marker(marker_id=13, filename="aruco_13.png", dictionary_name="DICT_4X4_50", size=400)
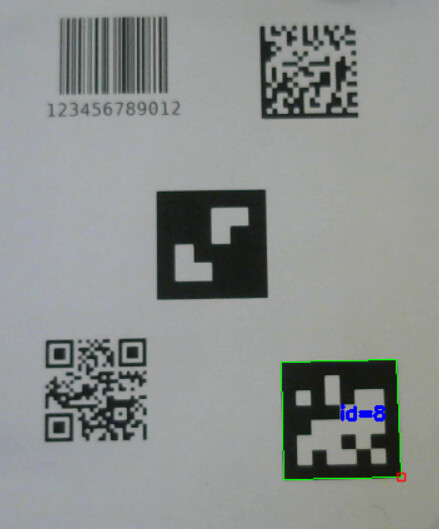
AprilTag
AprilTags are fairly similar to ArUco markers, although they do have a few differences.
Whilst AprilTags might be a bit more slow then ArUco markers, they make up for it by being more robust under various conditions combined with a greater accuracy. Additionally, the matrix used for encoding the tags is larger than then the side of the marker generated, this is to allow for greater accuracy and error correction.
One of the main downsides of the larger matrices here, is that it can make the encoding more difficult, especially since the libraries for AprilTags require the usage of C++.
Code for detection
Most of the code is also used for detecting ArUcoTags, the only significant difference being that it reads from the AprilTag dictionary 36h11, rather than a ArUco marker one.
code
import cv2 as cv
from cv2 import aruco

#The webcam to be used
Index = 0

def detect_april(frame):
    """Detect and draw ApriTags in the frame."""
    #Grayscale the image
    gray = cv.cvtColor(frame, cv.COLOR_BGR2GRAY)

    #Choose the ArUco marker dictionary being observed
    aruco_dict = aruco.getPredefinedDictionary(aruco.DICT_APRILTAG_36h11)
    parameters = aruco.DetectorParameters()

    #Create detector
    detector = aruco.ArucoDetector(aruco_dict, parameters)

    #Detect markers
    corners, ids, rejected = detector.detectMarkers(gray)
    detected_ids = []

    #Determine the ID of the tag and draw it for the feed
    if ids is not None:
        detected_ids = ids.flatten().tolist()
        aruco.drawDetectedMarkers(frame, corners, ids)

    return frame, detected_ids


if __name__ == "__main__":
    #Open the webcam
    cap = cv.VideoCapture(Index, cv.CAP_DSHOW)
    if not cap.isOpened():
        print("Error: Could not open webcam.")
        exit()

    while True:
        #Read the frame
        ret, frame = cap.read()
        if not ret:
            print("Error: Could not read frame from camera.")
            break

        # Detect ArUco markers
        frame, detected = detect_april(frame)

        # Print detected marker IDs
        for marker_id in detected:
            print("Detected ArUco ID:", marker_id)

        #Display camera feed
        cv.imshow('Webcam Feed', frame)

        #Wait a milisecond
        cv.waitKey(1)
Code for generation
Since the creation of an AprilTag requires the usage of C++, and we’re staying with python, the code below creates an AprilTag based on the result for a tag from the 36h11 dictionary, rather than the matrix used in the encoding itself. To create a different tag, the smaller matrix at the beginning of the code would need to be modified to an appropriate matrix for the desired tag.
code
from PIL import Image
import numpy as np


# Single AprilTag 36h11 — tag ID 8
TAG36H11 = {
    8: np.array([
    [0,0,0,0,0,0,0,0],
    [0,0,0,1,0,0,0,0],
    [0,1,0,1,0,1,1,0],
    [0,0,0,0,1,1,1,0],
    [0,0,1,1,1,1,1,0],
    [0,1,1,1,0,1,0,0],
    [0,1,0,1,1,0,1,0],
    [0,0,0,0,0,0,0,0]
], dtype=np.uint8)
}

def generate_apriltag(tag_id, filename="apriltag.png", size=300, border=20):
    """
    Generate a AprilTag image.

    tag_id: int, ID of the marker from the dictionary used
    filename: output PNG file
    size: output image size in pixels
    border: number of black border bits around the marker
    """

    if tag_id not in TAG36H11:
        raise ValueError(f"Tag ID {tag_id} not in dictionary")

    #Gets the specific tag from the dictionary containing them
    bits = TAG36H11[tag_id]

    #Generates the image
    img_arr = bits * 255
    img = Image.fromarray(img_arr, mode='L')
    img = img.resize((size, size), Image.NEAREST)

    #Generates the border of the AprilTag
    if border > 0:
        bordered = Image.new("L", (size + 2*border, size + 2*border), 255)
        bordered.paste(img, (border, border))
        img = bordered

    #Saves the image
    img.save(filename)
    print(f"AprilTag {tag_id} saved to {filename}")

if __name__ == "__main__":
    # AptilTag code
    generate_apriltag(tag_id=8, filename="apriltag_8.png", size=400, border=30)