Based on contributions by Personnel.
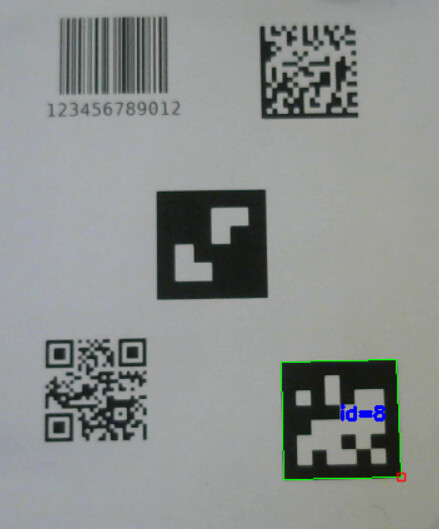
There are several types of machine-readable codes and markers you can use in a vision project: 1D barcodes and QR codes for storing information, data matrix codes for very dense small labels, and ArUco/AprilTag markers for pose estimation and tracking. This how-to explains what each one is good for, and gives working Python code to both detect them from a webcam feed and generate your own.
What you need
- A computer with Windows, macOS or Linux and a webcam.
- Python 3.8 or higher.
- OpenCV:
pip install opencv-python - For barcode/QR detection:
pip install pyzbar - For data matrix detection:
pip install pylibdmtx - For barcode generation:
pip install python-barcode - For QR code generation:
pip install qrcode pillow - For data matrix generation:
pip install pylibdmtx pillow
On Linux,
pyzbarandpylibdmtxneed their underlying C libraries (libzbar0andlibdmtx0) installed through your package manager ifpip installalone doesn’t work, for examplesudo apt install libzbar0 libdmtx0.
Steps
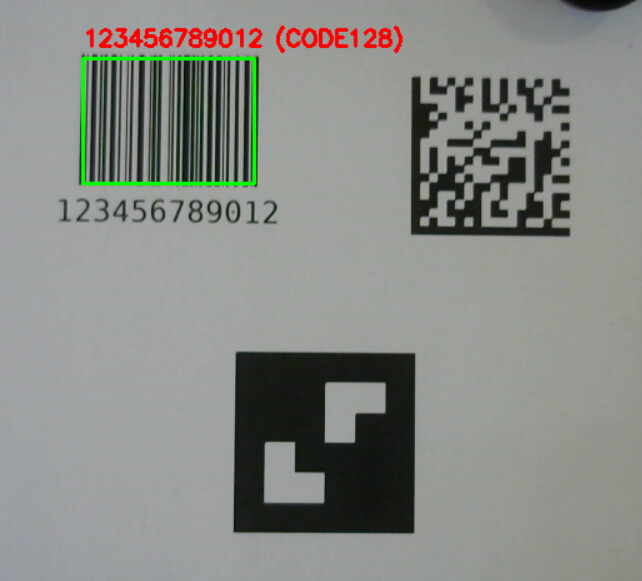
1. 1D barcodes
1-dimensional barcodes store a small amount of information, such as a single number, as a set of black and white lines. They’re quick to process and only need a small visible section (as long as the full width is visible), but they hold little data and have no error correction. A laser scanner can also read them at a fairly large range if one is available.
2. QR codes
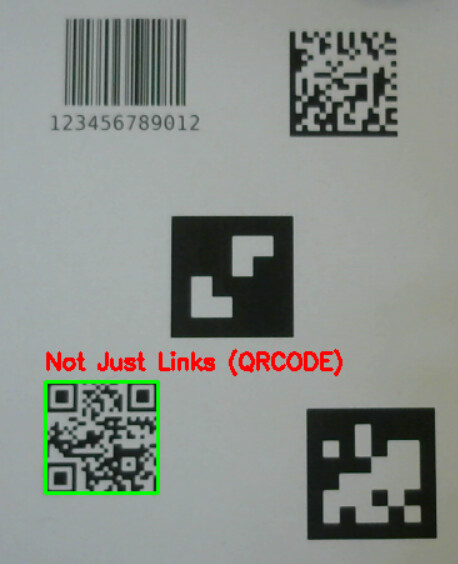
QR codes also store information, but as a 2D pattern, which allows much more data to be packed in and adds strong error correction (a decently large part of the code can be damaged or covered and still be read). The three corner squares make the code easy to detect, and most phone cameras can already read them.
3. Detect barcodes and QR codes
pyzbar decodes both 1D barcodes and QR codes with the same call, so one detection script covers both types.
import cv2
from pyzbar.pyzbar import decode

CAM_INDEX = 0  # webcam index; on Windows you can pass cv2.CAP_DSHOW as a second
                # argument to cv2.VideoCapture() if the wrong camera opens


def detect_barcodes(frame):
    """Detect and draw all 1D barcodes and QR codes in the frame using pyzbar."""
    gray = cv2.cvtColor(frame, cv2.COLOR_BGR2GRAY)
    barcodes = decode(gray)
    detected_data = []

    for barcode in barcodes:
        (x, y, w, h) = barcode.rect
        cv2.rectangle(frame, (x, y), (x + w, y + h), (0, 255, 0), 2)

        barcode_data = barcode.data.decode("utf-8")
        barcode_type = barcode.type
        text = f"{barcode_data} ({barcode_type})"
        cv2.putText(frame, text, (x, y - 10), cv2.FONT_HERSHEY_SIMPLEX, 0.6, (0, 0, 255), 2)
        detected_data.append(barcode_data)

    return frame, detected_data


if __name__ == "__main__":
    cap = cv2.VideoCapture(CAM_INDEX)
    if not cap.isOpened():
        print("Error: Could not open webcam.")
        exit()

    while True:
        ret, frame = cap.read()
        if not ret:
            print("Error: Could not read frame from camera.")
            break

        frame, barcodes = detect_barcodes(frame)
        for b in barcodes:
            print("Detected:", b)

        cv2.imshow("Webcam Feed", frame)
        cv2.waitKey(1)
4. Generate a 1D barcode
This generates a Code 128 barcode, which can hold ASCII characters (not just numbers) and is commonly used in logistics.
import barcode
from barcode.writer import ImageWriter


def generate_1d_barcode(data, filename="barcode.png", barcode_type="code128"):
    """
    Generate a 1D barcode image (Code128 or EAN13).

    data: string of the barcode content
    filename: output PNG file
    barcode_type: "code128" or "ean13"
    """
    barcode_class = barcode.get_barcode_class(barcode_type)
    my_barcode = barcode_class(data, writer=ImageWriter())
    my_barcode.save(filename)
    print(f"1D barcode saved to {filename}")


if __name__ == "__main__":
    generate_1d_barcode("123456789012", "my_barcode")
5. Generate a QR code
import qrcode


def generate_qr_code(data, filename="qrcode.png", size=300):
    """
    Generate a QR code image.

    data: string or URL
    filename: output PNG file
    size: size of the QR code image in pixels
    """
    qr = qrcode.QRCode(
        version=1,  # controls size, 1 = 21x21 modules
        error_correction=qrcode.constants.ERROR_CORRECT_H,
        box_size=10,
        border=4,
    )
    qr.add_data(data)
    qr.make(fit=True)

    img = qr.make_image(fill_color="black", back_color="white").convert("RGB")
    img = img.resize((size, size))
    img.save(filename)
    print(f"QR code saved to {filename}")


if __name__ == "__main__":
    generate_qr_code("Not Just Links", "my_qrcode.png")
6. Data matrix codes
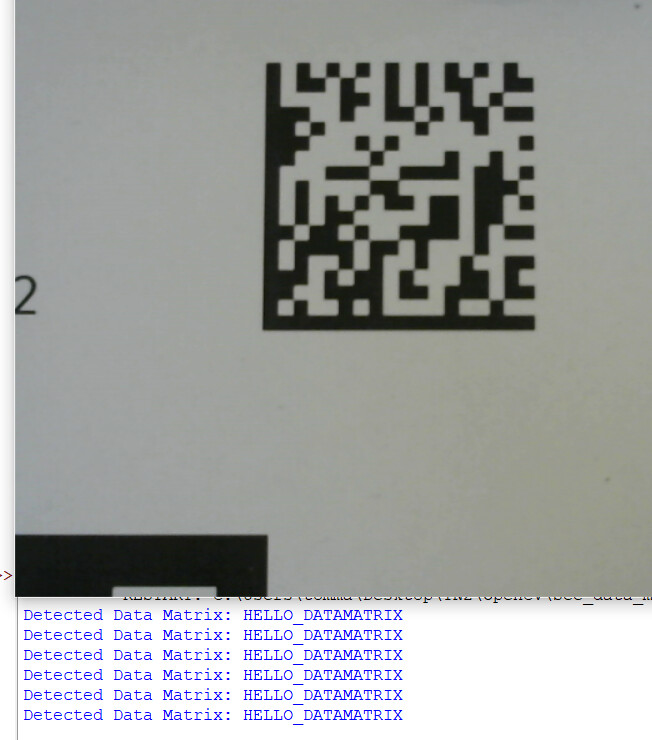
A data matrix is similar to a QR code in purpose but packs information even more densely, which makes it a good choice when the marker itself needs to be very small. It also has strong error correction, but holds less total data than a QR code.
Decoding a data matrix is noticeably slower than decoding a barcode or QR code, so it’s often better to decode from a single still image rather than continuously from a live feed. If you do need to decode several data matrix codes quickly from one image, see How to detect multiple data matrix codes fast using threading in Python.
7. Detect data matrix codes
This decodes only once every 30 frames, since decoding every frame would make the video feed lag.
import cv2
from pylibdmtx.pylibdmtx import decode

CAM_INDEX = 0
FRAME_WIDTH = 640
FRAME_HEIGHT = 480
SCALE = 0.5       # scale factor for decoding
FRAME_SKIP = 30    # decode every Nth frame

cap = cv2.VideoCapture(CAM_INDEX)
cap.set(cv2.CAP_PROP_FRAME_WIDTH, FRAME_WIDTH)
cap.set(cv2.CAP_PROP_FRAME_HEIGHT, FRAME_HEIGHT)

if not cap.isOpened():
    print("Error: Could not open webcam.")
    exit()

frame_count = 0
if __name__ == "__main__":
    while True:
        ret, frame = cap.read()
        if not ret:
            print("Failed to grab frame.")
            break

        frame_count += 1

        if frame_count % FRAME_SKIP == 0:
            small_frame = cv2.resize(frame, (0, 0), fx=SCALE, fy=SCALE)
            gray_frame = cv2.cvtColor(small_frame, cv2.COLOR_BGR2GRAY)

            decoded_results = decode(gray_frame)
            for d in decoded_results:
                data = d.data.decode("utf-8")
                print("Detected data matrix:", data)

        cv2.imshow("Data Matrix Detection", frame)
        cv2.waitKey(1)
8. Generate a data matrix code
from pylibdmtx.pylibdmtx import encode
from PIL import Image


def generate_data_matrix(data, filename="datamatrix.png", size=300):
    """
    Generate a data matrix code image.

    data: string content for the code
    filename: output PNG file
    size: output image size in pixels
    """
    encoded = encode(data.encode("utf-8"))
    img = Image.frombytes("RGB", (encoded.width, encoded.height), encoded.pixels)
    img = img.resize((size, size), Image.NEAREST)
    img.save(filename)
    print(f"Data matrix saved to {filename}")


if __name__ == "__main__":
    generate_data_matrix("HELLO_DATAMATRIX", "my_datamatrix.png")
9. ArUco markers and AprilTags
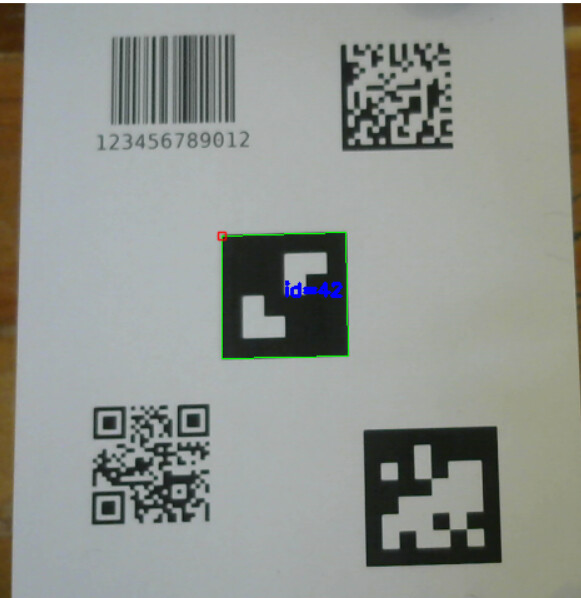
ArUco markers and AprilTags aren’t for storing information, they’re for pose estimation and tracking: a library of markers is generated, each with a unique ID, and a camera can detect and follow them. Both work well with OpenCV.
- ArUco markers are fast and simple, a good default choice for an easy tracking solution.
- AprilTags are a bit slower to detect but are more robust under difficult conditions (poor lighting, partial occlusion) and more accurate, because the underlying encoding matrix is larger than the tag itself.
10. Detect ArUco markers or AprilTags
Detection code for both is identical apart from which predefined dictionary you load, so one script handles both. Set DICTIONARY to aruco.DICT_4X4_50 for ArUco markers, or aruco.DICT_APRILTAG_36h11 for AprilTags.
import cv2
from cv2 import aruco

CAM_INDEX = 0
DICTIONARY = aruco.DICT_4X4_50  # or aruco.DICT_APRILTAG_36h11 for AprilTags


def detect_markers(frame, dictionary_id):
    """Detect and draw ArUco markers or AprilTags in the frame."""
    gray = cv2.cvtColor(frame, cv2.COLOR_BGR2GRAY)
    marker_dict = aruco.getPredefinedDictionary(dictionary_id)
    parameters = aruco.DetectorParameters()
    detector = aruco.ArucoDetector(marker_dict, parameters)

    corners, ids, _ = detector.detectMarkers(gray)
    detected_ids = []
    if ids is not None:
        detected_ids = ids.flatten().tolist()
        aruco.drawDetectedMarkers(frame, corners, ids)

    return frame, detected_ids


if __name__ == "__main__":
    cap = cv2.VideoCapture(CAM_INDEX)
    if not cap.isOpened():
        print("Error: Could not open webcam.")
        exit()

    while True:
        ret, frame = cap.read()
        if not ret:
            print("Error: Could not read frame from camera.")
            break

        frame, detected = detect_markers(frame, DICTIONARY)
        for marker_id in detected:
            print("Detected marker ID:", marker_id)

        cv2.imshow("Webcam Feed", frame)
        cv2.waitKey(1)
11. Generate an ArUco marker
This generates the ArUco marker with ID 13 from the 4x4-50 dictionary.
import cv2

ARUCO_DICTS = {
    "DICT_4X4_50": cv2.aruco.DICT_4X4_50,
    "DICT_4X4_100": cv2.aruco.DICT_4X4_100,
    "DICT_4X4_250": cv2.aruco.DICT_4X4_250,
    "DICT_4X4_1000": cv2.aruco.DICT_4X4_1000,
    "DICT_5X5_50": cv2.aruco.DICT_5X5_50,
    "DICT_5X5_100": cv2.aruco.DICT_5X5_100,
    "DICT_5X5_250": cv2.aruco.DICT_5X5_250,
    "DICT_6X6_50": cv2.aruco.DICT_6X6_50,
    "DICT_6X6_100": cv2.aruco.DICT_6X6_100,
    "DICT_6X6_250": cv2.aruco.DICT_6X6_250,
    "DICT_7X7_50": cv2.aruco.DICT_7X7_50,
    "DICT_7X7_100": cv2.aruco.DICT_7X7_100,
    "DICT_7X7_250": cv2.aruco.DICT_7X7_250,
    "DICT_ARUCO_ORIGINAL": cv2.aruco.DICT_ARUCO_ORIGINAL,
}


def generate_aruco_marker(marker_id, filename="aruco.png",
                           dictionary_name="DICT_4X4_50",
                           size=300, border=1):
    """
    Generate an ArUco marker image.

    marker_id: int, ID of the marker from the dictionary
    filename: output PNG file
    dictionary_name: name of the dictionary from cv2.aruco
    size: output image size in pixels
    border: number of black border bits around the marker
    """
    if not filename.lower().endswith(".png"):
        filename += ".png"

    if dictionary_name not in ARUCO_DICTS:
        raise ValueError(f"Unknown dictionary '{dictionary_name}'. "
                          f"Valid options: {list(ARUCO_DICTS.keys())}")

    dictionary = cv2.aruco.getPredefinedDictionary(ARUCO_DICTS[dictionary_name])
    marker_img = cv2.aruco.generateImageMarker(dictionary, marker_id, size, border)
    cv2.imwrite(filename, marker_img)
    print(f"ArUco marker saved to {filename}")


if __name__ == "__main__":
    generate_aruco_marker(marker_id=13, filename="aruco_13.png", dictionary_name="DICT_4X4_50", size=400)
12. Generate an AprilTag
Generating a genuine new AprilTag requires the (C++) AprilTag library. If you just need to print an existing tag from Python, you can render it from its known bit matrix instead. The example below renders tag ID 8 from the 36h11 dictionary; to print a different tag you need that tag’s own bit matrix.
from PIL import Image
import numpy as np

# Single AprilTag 36h11 — tag ID 8
TAG36H11 = {
    8: np.array([
        [0, 0, 0, 0, 0, 0, 0, 0],
        [0, 0, 0, 1, 0, 0, 0, 0],
        [0, 1, 0, 1, 0, 1, 1, 0],
        [0, 0, 0, 0, 1, 1, 1, 0],
        [0, 0, 1, 1, 1, 1, 1, 0],
        [0, 1, 1, 1, 0, 1, 0, 0],
        [0, 1, 0, 1, 1, 0, 1, 0],
        [0, 0, 0, 0, 0, 0, 0, 0],
    ], dtype=np.uint8)
}


def generate_apriltag(tag_id, filename="apriltag.png", size=300, border=20):
    """
    Generate an AprilTag image from its known bit matrix.

    tag_id: int, ID of the tag (must be in TAG36H11)
    filename: output PNG file
    size: output image size in pixels
    border: white border in pixels around the marker
    """
    if tag_id not in TAG36H11:
        raise ValueError(f"Tag ID {tag_id} not in dictionary")

    bits = TAG36H11[tag_id]
    img_arr = bits * 255
    img = Image.fromarray(img_arr, mode="L")
    img = img.resize((size, size), Image.NEAREST)

    if border > 0:
        bordered = Image.new("L", (size + 2 * border, size + 2 * border), 255)
        bordered.paste(img, (border, border))
        img = bordered

    img.save(filename)
    print(f"AprilTag {tag_id} saved to {filename}")


if __name__ == "__main__":
    generate_apriltag(tag_id=8, filename="apriltag_8.png", size=400, border=30)
Common mistakes
- Using
cv2.VideoCapture(index, cv2.CAP_DSHOW)on Linux or macOS:CAP_DSHOWis a Windows-only backend and will fail to open the camera elsewhere. Just usecv2.VideoCapture(index), or pick the backend for your OS. - Trying to decode a data matrix on every video frame: it’s much slower than barcode/QR decoding and will make your feed stutter. Skip frames, or only decode from a still image.
- Forgetting that generated AprilTags from the snippet above only work for tag IDs you have the bit matrix for; it does not generate arbitrary new tags.
Related
Rewritten and consolidated (Sept 2026) from the original student how-to’s: How to work with markers.