Based on contributions by xtrashrr.
Kawasaki’s AS language is not very beginner-friendly, so the PromoBot_class.py wrapper gives you UR-style function calls (JMOVE, LMOVE, HOME, SPEED, …) from Python instead. This article shows how to install and use it once you already have a working TCP connection to the robot.
What you need
- A working TCP connection between your PC and the Kawasaki robot, with the TCP robot code uploaded to the controller: How to connect a Kawasaki robot to a Python program over TCP or UDP
- Basic teach pendant setup: Kawasaki robot (hands-on)
- The PromoBot class source (
PromoBot_class.py), placed in the same directory as your Python script - Python 3
Steps
1. Connect your laptop to the robot
Follow the basic hands-on setup first: Kawasaki robot (hands-on).
2. Make sure the TCP robot code is loaded on the controller
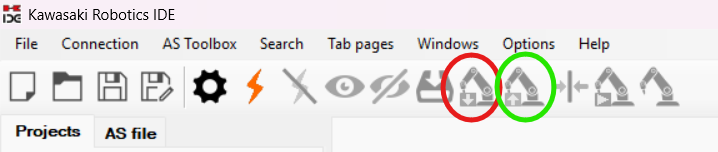
PromoBot_class.py talks to the robot over the TCP robot code AS programs. Check on the pendant whether these are already uploaded (button circled in red below). If not, upload them from the GitHub repo (button circled in green).
3. Import the class in your Python script
Keep PromoBot_class.py in the same folder as your script, then import the robot you need:
from Promobot_class import Kawasaki_1
# Kawasaki_1 refers to a Kawasaki FS03N; edit the class if you're using a different robot
4. Control the robot with the class methods
| Method | Description |
|---|---|
PAUSE |
Pause robot motion (the foreground program stops; the background program keeps running) |
CONTINUE |
Resume motion after PAUSE |
WAIT_UNTIL_DONE |
Block until the previous command finishes, so you don’t need manual delays |
printIP |
Print the robot’s IP address |
HOME |
Move to the robot’s home position (set on the teach pendant) |
HOME2 |
Move to the robot’s second home position |
HERE |
Return the current joint position |
HERE_TRANS |
Return the current cartesian (TCP) position |
CP |
Toggle continuous pathing on/off |
ACCEL |
Set acceleration for the next move command |
ACCEL_ALWAYS |
Set a persistent acceleration |
DECEL |
Set deceleration for the next move command |
DECEL_ALWAYS |
Set a persistent deceleration |
SPEED |
Set the robot’s speed |
JMOVE(JT1..JT6) |
Joint move, given joint angles |
JMOVE_TRANS(X,Y,Z,O,A,T) |
Joint move, given a TCP (cartesian) target |
LMOVE(JT1..JT6) |
Linear move, given joint angles |
LMOVE_TRANS(X,Y,Z,O,A,T) |
Linear move, given a TCP (cartesian) target |
TOOL(x,y,z,o,a,t) |
Set the tool’s rotation point, based on your end-of-arm tooling |
The class also contains related helper classes for the Promobot project, such as Robot_Hand and Intel_Camera, for controlling the gripper and camera.
5. Example: moving two robots at once
from Promobot_class import Kawasaki_1
from Promobot_class import Kawasaki_2

k1 = Kawasaki_1()
k2 = Kawasaki_2()

k1.printIP()
k2.printIP()

k1.SPEED(100)
k2.SPEED(45)

k1.TOOL(0, 0, 0, 0, 0, 0)
k2.TOOL(0, 0, 0, 0, 0, 0)

k1.HOME()
k2.HOME()

k1.JMOVE(4, -15, -125, 9, 22, 170)
k2.JMOVE(4, -15, -125, 9, 22, 170)

k1.JMOVE_TRANS(20, 370, 150, 90, 90, 90)
k2.JMOVE_TRANS(20, 370, 150, 90, 90, 90)

k1.JMOVE_TRANS(20, 550, 150, 90, 90, 90)
k2.JMOVE_TRANS(20, 550, 150, 90, 90, 90)

k1.LMOVE_TRANS(20, 370, 150, 90, 90, 90)
k2.LMOVE_TRANS(20, 370, 150, 90, 90, 90)
Check:
PromoBot_class.pyis student-maintained code, not a vendor library. Check the current version on GitHub before relying on the exact method list above — it may have changed since this was written.
Related
- How to connect a Kawasaki robot to a Python program over TCP or UDP
- Kawasaki robot (hands-on)
- How to pause a Kawasaki robot on command using a background PC program
- How to create a custom GUI panel on a Kawasaki teach pendant
Rewritten and consolidated (Sept 2026) from the original student how-to’s: How to control Kawasaki Robot using PromoBot Class.